Feeds:
Posts
Comments

Archive for the ‘Training’ Category

On Saturday, June 12th, a group of us headed up to Mt. Rainier to do a training climb to Camp Muir. We lucked out with the weather, as it was the first sunny day in what felt like weeks, and it had to be one of the most beautiful days of the year thus far. I had never been to Camp Muir before, and was excited and nervous for my first alpine experience.

We had six in our group. Our group consisted of myself, Hans, Dan, and Kevin (all participating in the Slalom Rainier climb in two weeks) and we were led by Michael and Margaret, friends of Hans who had been to Muir several times before. It was great to have some experience with us. I packed my backpack will all the gear I had, trying to simulate the experience to come. It weighed about 20 lbs. I will probably be 10 lbs heavier next time. A couple key pieces of gear I had on from the start were my gaiters, mountaineering boots, soft shell pants, and glacier goggles. All were key. I had on sunscreen too, but not enough!

There had been some ominous signs leading up to Saturday, with an avalanche the weekend prior and another high avalanche warning in place in the Cascades. Even our barista chimed in with her two cents as we stopped for coffee on our way down. We checked in with the ranger before heading out and were pleased to hear that the trail to Muir was safe, provided you stayed near it. And when we got there, there was a ton of people headed to Muir, so that was also reassuring.

We arrived at Paradise around 9:30 AM and started the hike at about 10:00 AM. Paradise is at about 5,000 feet and Camp Muir lies just about 10,000 feet. All in all it is about a 5 mile hike that rises 5,000 feet in elevation. And every step in snow. Paradise still had a huge base at this point in the year.

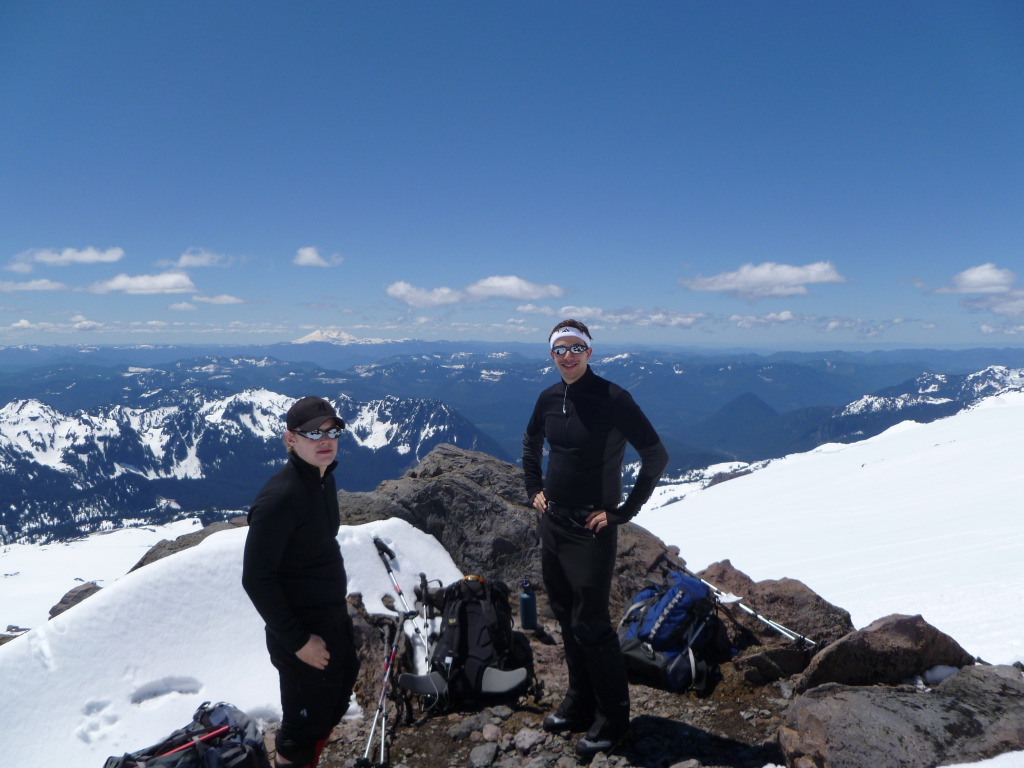
We encountered the first real test at about 6500 feet, which was a trek up a steeper section to Panorama Point. Stepping in previous tracks, it’s almost like going up an ice staircase. After that the slog began and at about the 2 hour mark, we took a break. We were at about 8,00 feet and the views were just spectacular. I was feeling good at this point, but was definitely ready to take off the pack and have a snack and water. It was also fun to snap some pictures and video. The six of us were hiking as a group at this point.

After this rest, we pushed forward. We started to separate a bit at this point, with everyone starting to go at their own comfortable pace. I followed Hans and Kevin, who were in sight but took the lead. It took about two more hours to get to Muir. You can start to see Muir when getting to the beginning of the Muir Snowfield, but you are about 3/4 of a mile out at that point, and it takes a while to finish of the rest of the way. It is slow going towards the top, as the air is thin. I was taking 40 steps at a time and then catching my breath.

Hans arrived first and found several members of our Slalom group that had already ascended. It was a bit of a reunion at the top, and we all were in great spirits having reached 10,000 feet and the Camp. When they called out to me as I arrived, I tried to kick in gear to reach them, but really couldn’t. I had to keep it slow and steady but got there the same. Amazing how a few quick steps will tire you out up here. It took us about 4 hours from Paradise to reach Camp Muir.

We took photos and video as we ate, rested, and chatted over the next hour. I felt really strong after catching my breath, and did not have altitude sickness, which was great. We ran into a group of people who were planning to stay the night, and they had lugged a keg of Rainier beer up to the camp! Needless to say, everyone was in a bit of disbelief at this feat. Apparently 6 people hauling a keg on a sled did the trick. Some of us dumped out a water bottle and filled er up. It was pretty hilarious.

The way down from Muir turned into a real slog. We were able to glissade down some chutes, which was fantastic, but there weren’t near enough of them. The snow turned soft and deep in the afternoon sun, and frequently you ended up sinking in to your knee with each step. We went down at a fast pace, but it felt like a long way down nonetheless. It took about 2 hours to get down. I have a feeling the trek down in a couple of weeks will be long and tough as well.

All in all it was an amazing day. The views were fantastic and I left feeling much more confident about our trip in two weeks. Making it to 10,000 feet and back, and still feeling pretty good was a great sign.

Here is a link to the YouTube playlist containing other videos from the trip: http://www.youtube.com/view_play_list?p=F4BF29ABC1188383

Read Full Post »

Mailbox Peak

I hiked Mailbox Peak with Hans on Friday, June 4th. It was the hardest hike I have done to date in my training, and it felt great to get out and do something that was a lot more challenging. Having done Mt. Si and Tiger Mountain pretty much exclusively thus far this spring, this was definitely a cut above. Here is a link to an article written about the hike in the Seattle PI.

One of the videos in this post is a video I took from Mt. Si looking over at Mailbox Peak, just to the east. What you would only know from the trail itself is that it is pretty much straight up the entire way. It feels like you are going directly up the slope, rather than back and forth on a series of gradual switchbacks. I think you can reach forward and touch the slope in some parts. Furthermore, the terrain is rough. It doesn’t feel like a trail at all. Sometimes there is no trail. Sometimes you are just trying to avoid losing your boots in deep mud. Sometimes you are sliding 15 feet down on your ass after losing your footing (this was me once on the way down).

The hike, or climb itself, gains over 4,000 feet of elevation in just under 3 miles. That is well over 1,000 feet of gain per mile….pretty intense. It took us about 2:20 to get to the top, with only taking a minute or two for rest a couple of times. We were each carrying about 25 pound packs. We felt awesome about the time. We rested for 5 minutes after descending off the peak and into the trees for some shelter.

From the other video in this post (of Hans and I on the summit), you can see that the weather was dicey at best. It wasn’t snowing, which was good. But it was wet and cold. It felt like we were in a cloud. We were sheltered for most of the climb, but for the last 1/2 mile or so, you emerge from the trees and ascend up towards the actual peak, which is exposed. It grew much colder and nastier once out of the trees. We didn’t spend much time at the top itself. We didn’t even investigate the mailbox at the top (for which the hike is named). People leave all sorts of cool stuff in that mailbox. It is tradition to leave something there in it. But I will wait for next time. I need to make it up again just to check out the view. I hear it is awesome, but there was nothing to see this day.

After that 5 minute rest and snack, we descended the rest of the way. I think we were both ready to be down and warm again. And to get some food. We did it all in 4 hours. We hit the truck stop for a meal afterwards and coffee and reminisced about the adventure.

It felt great to get myself out there a little bit, out of the comfort zone, as Rainier approaches.

Here are a few other videos we took during the Mailbox Peak hike. Video of us starting out, a clip in the forest, and then footage as I arrived on the peak.

Read Full Post »

Thy and I did Camp Muir on Sunday in challenging conditions.  Visibility was poor with fairly persistent wind and snow.  We got to about 9,200 and had to turn around since we were warned about going on unless we were prepared to spend the night at Muir, and we weren’t.  We were on target for about 5 hours to get to Muir at a steady but not adventurous pace.  Probably a good call since the weather started closing in just as we were getting off the mountain. 

Since there was some new snow we did most of it in snow shoes, up and down.  Snow was too soft for crampons to make a difference and my gators kept filling up over the top of my boots trying to posthole.  I was curious about that since RMI doesn’t list snow shoes on the equipment list, from my recollection.  In reading other posts, it sounds like snow pants with interior ankle gators underneath the main gators are the only way to go if you want to keep snow out of your boots confidently.

I have the Mountain Hardwear South Col backpack.  I noticed that my gear was wet inside at the end of the day, especially the bottom when the pack had been sitting on the ground.  I couldn’t find a reference to “waterproof” in the specs so I am going to line the inside of the pack with a garbage compactor bag next time.  We did this on Baker and it worked great.

I dumped my old boots after getting soaked on St Helens.  My new Zamberlans were the bomb and I used the heat moldable “Sole” insoles rather than Superfeet this time.  They were great, I’m now a convert from Superfeet.  I am planning to rent the premium mountaineering boots from RMI rather than buying.  Although I was thinking about taking regular boots for the lower part of the mountain and the mountaineering boots for the summit, since there is snow all the way to Muir, I think I’m going to save the weight and just take the mountaineering boots all the way.

My high quality ski gloves were soaked through, so I need to rethink the glove situation now that I solved my feet issue.

I tried my hydration pack without insulation, and the drinking tube started to freeze.  So I am going to need to insulate it even for the lower section, and/or have bottle backups.

Even in 25-30MPH winds, I only had on a hard shell with a windstopper soft shell and a wicking layer and was plenty warm while moving – but cooled down super fast when stopped.

We past some groups on the way down who had summited the night before, even with bad weather.  One group only had 4 reach the top out of 16 though.

We are thinking about doing Camp Muir again the weekend of 6/11, probably spending the night in Ashford beforehand to get an early start without getting up at butt o’clock.

Read Full Post »

Rainier – Tips and Tricks

Thy and I had the benefit of meeting one of his colleagues who has 3 Rainier summits under his belt – including one with RMI and another where he cycled from Seattle and then summitted Rainier and cycled back in one day!  He shared some interesting tips:

  • Layering & Personal Temperature – the lower elevations can be warm and there can be dramatic temperature variances on the upper parts of the mountain since you will be climbing hard then waiting for extended periods at log jams.  Having layers and a system of being able to put stuff on/take it off easily is important.  Also think through mechanics of easy access for bathroom breaks without stripping.  RMI is also strict about when you can take off your pack, so we won’t always be able to stop and re-adjust on our own schedules.
  • Dummy Cords – At higher elevations where it is really windy, dummy cording stuff is important.  Anything that isn’t nailed down will fly off.  Also good when you get tired/lacking focus.
  • Gear System – having pockets or your own system for consistency on what goes where in your gear will really help, e.g. goggles always go here, glasses always here etc.  Also think about your pack and what you’re going to need that day so you can put it near the top.
  • Water System – Having access to water as you climb is important, but hydration packs freeze and bottles strapped in or on a pack aren’t easily accessible.  So test out your own system in advance and have a plan.
  • Food System – Similar to water, easy access to snacks is helpful to keep energy up on the big day.  Take advantage of extra pockets or add-on pouches to your pack to have things handy.  Note that things like Power Bars freeze at higher elevations so aren’t good choices.
  • Meals at Camp Muir – apparently the hot water available at Camp Muir isn’t always super hot.  This can cause problems with dehydrated meals since they don’t cook properly.
  • Taping Feet – If you have sensitive feet or are prone to blisters, try pre-taping using something durable, even duct tape.  The plastic boots also increase moisture which can add to chafing.
  • Personalizing Your Gear – Rental gear is cool, but doesn’t give you the chance to do “dress rehearsals”, personalize your pack, or check for “hot spots” that might be rubbing.  If you’re renting, try trying everything once before the real deal.
  • The Small Things Matter – Opening zip lock bags for snacks in the dark with mitts at 10,000 ft becomes a challenge.  Simple stuff like adding duct tape tabs makes life a lot easier without taking off your gloves.  Check out your own system and figure out your routines/preferences.
  • Technique – In addition to other rescue skills, we’ll also learn stuff like “the rest step” to reduce exertion and “pressure breathing” at altitude.  If you want to get a head start, Google them, read up, and do some practice so it becomes more natural.  Learning two days before might not allow you much time to get accustomed to it.
  • The Shoe’s On the Other Foot – Climbing the entire mountain in rigid plastic boots alone is rough, especially on lower elevations.  Consider packing regular hiking boots in addition to the plastic boots.  There is a trade-off in terms of space/weight, but ultimately down to your preference as to whether you think you can clump all the way  back down or whether you want the convenience of a regular hiking boot.

Hope this helps!

Read Full Post »

Thy, Mike and I tried Mailbox Peak this weekend – 6 miles round trip with an elevation gain of 4,000 feet.  We thought about doing Mt Si but had two dogs along and thought it might be too busy.

I started off with 4 gallon jugs of water plus pack weight ~ 45lbs.  After about 20 mins I had to drop two jugs, it’s a steep climb.  Thy and Mike schlepped up all 4, but it wasn’t working for me that day.  Parts are near vertical and it is definitely a quad killer.

About 3/4 of the way up we started getting into snow and were wading through it by the time we got to the rock slide area, two false summits short of the peak.  The dogs weren’t doing well in the deep snow on the steep section and weren’t keen on the rock slide so we called it a day there.  That took us over 3 hours.  It ended up being just shy of 6 hours by the time we got back down.

I think we bit off a bit more than we could chew, but it was a humbling reminder that there’s still work to do to get ready.  We also didn’t have gaiters, a must for snow since my boots kept filling up.

It is very muddy right now, personally I think there are other better options so I wouldn’t recommend it unless you want to romp through the mud.

Read Full Post »

Mt. Si Weekend Climb

Hey Yall,

So I decided to give Mt. Si a shot this weekend.  I figured that we are roughly two months out and need to start pushing myself harder.

First of all the conditions:

The first two miles are not bad at all.  As usual large amount of traffic, but the trail is in general good condition otherwise.

At mile marker 2 you really start to see the snow build up.  The trail is wet, but manageable.

Right around mile marker 3 you really start to get into the snow field.  For added weight I have started taking my crampons and today I actually used them.  I do recommend that if you have the opportunity, go for a hike in them as they have a completely different feel on the trail.

The snow is melting fast on the trail so if you want to give the trail a try I would recommend doing it soon.

As for my hike time:

It was 2:30 up and 1:53 down.
I had a 30 lb pack and dog 🙂

Enjoy the pictures

This slideshow requires JavaScript.

Read Full Post »

Rainier Crew-

I received this email today and thought I’d share the suggestion w/ the rest of you:

Hey Hans,

Mailbox peak is on I-90 Exit 34. It is 3 miles to the top and gains ~4000 feet. We did this last year when training for Mount Saint Helens. I would like to recommend it as a good training hike of Mt Rainier.

Here are some links for more info:

http://www.summitpost.org/view_object.php?object_id=150711

http://www.attrition.ws/index~Hike_Review~MailBox_Peak_Mt._Baker_National_Forest-Snoqualmie_WA~page~hikeoverview~HikeInstanceID~86.cfm

Thanks

Sudhakar

****************************

I’ve done Mailbox Peak in the past and can confirm that it’s no joke.  Here’s a blub from an article on Mailbox that was posted roughly 12 years ago:

Mailbox Peak is a good winter tonic — it’s nasty but good for you. This hike is bitter medicine unless your quads are made of iron, but Mailbox should be done once a year if you are a serious hiker.

You’ll earn the respect of your fellow hikers at a holiday potluck if you casually mention, “Yeah, I did Mailbox last week — 2-1/2 hours up, 1-1/2 hours down.” Chances are good they didn’t climb Mailbox Peak. Chances are good they haven’t even heard of the place.

A serious hiker can always embellish a hike, throwing in hazards here and there, and omitting such niceties as the fact that Mailbox is only a stone’s throw from a hot bowl of chili at the truck stop off Edgewick Road. Throw in a pair of snowshoes and an ice ax (whether needed or not) and earn even more respect.

However, having accomplished the hike, you might not want to get out of bed the next day. Plan this hike on a Saturday if your work requires you to show up bright eyed and limber on Monday. However, if you can hike up Mailbox Peak and get out of bed the next day, you are in moderately good condition. If you climbed Mount Si the day before, you are in excellent condition.

If you’d like to read the rest of the Seattle PI article please click here

Alright who’s with me!?  Let’s get a training hike on the books.  Please post some possible dates in the comments section.

-Hans

Read Full Post »

We are planning to do a training climb of Mt. St. Helens in preparation for our June climb of Mt. Rainier!  This climb will be a great milestone as we build up our training.

Mt. St. Helens is located about 100 miles south and Seattle.  Climbing the mountain is popular amongst both beginning and experienced mountaineers.  Here is an excerpt from the US Forest Service’s website about the climb:

Most climbers use the Monitor Ridge Route from Climbers Bivouac. This route gains 4,500 feet in five miles to the crater rim at 8,365 feet elevation. Although strenuous, this non-technical climb is suitable for people in good physical condition who are comfortable scrambling on steep, rugged terrain. Most climbers complete the round trip in seven to twelve hours.

We are targeting Saturday, May 15th as a possible date to organize a group to head down to the mountain.  A climbing permit is required, and only costs $22.  Some of us have purchased permits already.  You can check on permit availability before buying.   You can purchase permits from this site.

– Joel

Read Full Post »

Here’s a quick little video w/ some training tips.  Anyone else digging the 1980’s promo music?

In addition, RMI has put together a list of training suggestions to get you ready for the physical challenge.  These items include:

  • Start training immediately. The more time you have to get in shape, the better.
  • Cardiovascular training (such as running and cycling) and strength and endurance training (such as weight training and stair climbing) should both be included in your program.
  • Start cardiovascular training by running, biking, hill climbing, or using step machines. Try exercising for an hour or more per session, and keep your heart rate and respirations at a reasonably high level, without over doing it. Three to four long training sessions per week are going to be more beneficial than short daily workouts. The intensity of your workout should reflect the level of effort we anticipate needing to climb the last 1,000′ to the summit.
  • Begin your strength training by working on muscle groups used in mountaineering. Specifically, you want to target your quadriceps, calves, hamstrings, back and shoulder muscles.
  • There is no better training for mountaineering than up and downhill hiking. Get outside and go on extended hikes with a weighted backpack 2 – 3 times per week. Try hiking for 60 to 90 minutes at a time with a 10 – 15 minute break after each segment. Begin your training program with a 20 – 25 pound pack and work up gradually to the approximate weight expected to be carried on the climb. If there are no hills nearby, stairs work fine for training, especially if you can find a taller multiple storied buildings or stadium steps. When working out in a gym, use stair stepping machines and treadmills with a weighted pack. Additionally, treadmills raised up to the full 15 degrees will be more beneficial than running on relatively flat terrain.
  • Bottom line: Plan on being in the best shape of your life!

For more detailed information on how to train for Rainier, please visit RMI’s page on Physical Fitness & Conditioning for Mountaineering

Read Full Post »

A popular training hike near Seattle are the trails at Mount Si.  Many people recommend hiking Mount  Si when training to climb Mt. Rainier.

Mount Si is located in North Bend, WA, about 30 minutes east of Seattle on I-90.  Mount Si has an elevation of 4,167 ft.  There are two main trails:  Mount Si and Little Si.  The main Mount Si trail is about a 4 mile hike to the top, covering around 3,700 feet of elevation gain.

Here are some links for more information:

There are a few of us doing the main trail tomorrow (Saturday, March 6th).  Let Hans or I know if you are interested in meeting up.

– Joel

Read Full Post »

Older Posts »